
There are times when bigger truly is better, especially when it comes to Mac screens. Over the years, Apple has offered a range of display sizes, from the compact 11-inch screens of older MacBook Air models to the expansive 16-inch MacBook Pro displays available today. While Apple provides various ways to extend your screen, whether through an iPad via Sidecar or an external monitor, one of the most impactful ways to achieve a massive display is by using a TV screen.
In 2024, you can find large smart TVs for under $500, and some unique models can make whatever you’re sharing from your Mac look even more impressive than it would on your laptop screen. With a TV, you have the option to either mirror your Mac’s display or extend it, allowing you to keep working outside the visible area. Whether you’re sharing photos and videos from a recent trip or presenting the latest version of a client deck, using a TV as a large Mac display can be highly beneficial.
There are two main ways to connect your Mac to a TV: wirelessly or via a wired connection. Depending on your preference, here’s how to set up both methods to connect your Mac to a TV.
Wireless Connection
The easiest way to connect your Mac to a compatible smart TV is through AirPlay. Many modern smart TVs come with built-in AirPlay support. To check if your TV supports AirPlay, refer to the Apple Home accessories list, consult your TV’s manual, or visit the manufacturer’s website. Ensure both your Mac and TV are on the same, stable internet connection. Here’s how to set it up:
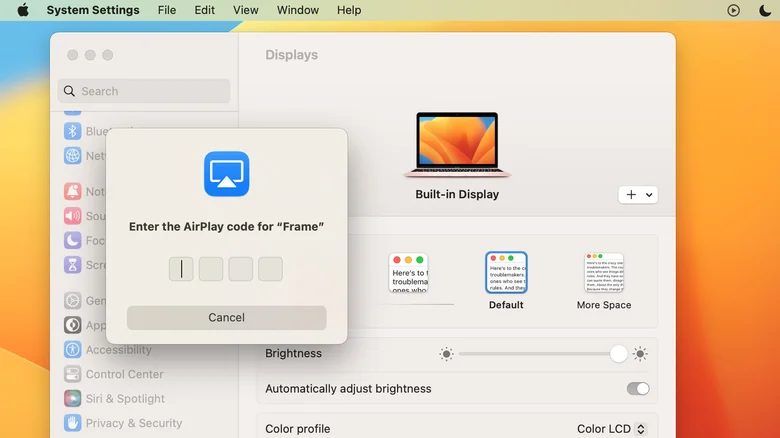
- On your Mac: Click the Apple icon, select System Settings, then go to Displays in the left sidebar. Click the plus (+) icon next to your Mac’s name.
- Alternatively: Click the Control icon in the upper-right corner of your screen, then choose Screen Mirroring > Display Settings.
Enter the four-digit code displayed on your TV screen into your Mac to complete the pairing.
If you encounter issues with AirPlay, try moving your Mac and TV closer together, updating their firmware, or restarting both devices. If your TV isn’t AirPlay-compatible, consider using streaming devices like the Apple TV 4K, Roku, or Google Chromecast. Google Chromecast offers additional benefits even if you already own a smart TV. For issues with casting from your iPhone to your smart TV, consult our troubleshooting guide.
Wired Connection

If your smart TV isn’t compatible with any of the available wireless options, you can opt for a wired connection. This is especially useful if you have a weak internet signal or experience frequent signal interference, as a wired connection tends to be more stable. To set this up, first connect your Mac to your smart TV using the appropriate cable. Depending on your TV model, you might need to perform some additional setup. For instance, Samsung Frame TVs require you to select the device type to help with optimal settings recommendations.
If your Mac lacks an HDMI port and you need to connect it to your TV, consider purchasing an adapter or dock, such as the Apple USB-C Digital AV Multiport Adapter ($69). While there are numerous third-party options, they may not always meet quality standards or ensure compatibility. Additionally, HDMI cables come in different types, so for the best performance, especially with a TV that supports a 120Hz refresh rate, opt for an HDMI 2.1 cable. You can find the 2-meter Belkin UltraHD High Speed 8K/4K HDMI Cable ($29.95) or the Belkin 4K Mini DisplayPort to HDMI Cable ($59.95) at the Apple Store, both tested for Mac compatibility.
Fixing Mac Screen Display Issues on TV
If your Mac screen doesn’t fit your TV display properly, it could be due to overscan or underscan. Overscan means parts of the screen are cut off, like the menu bar or dock disappearing. Underscan shows the entire screen but with black bars around the edges. Here’s how to fix these issues:
- On your Mac, click the Apple icon in the upper-left corner of the screen.
- Select System Settings.
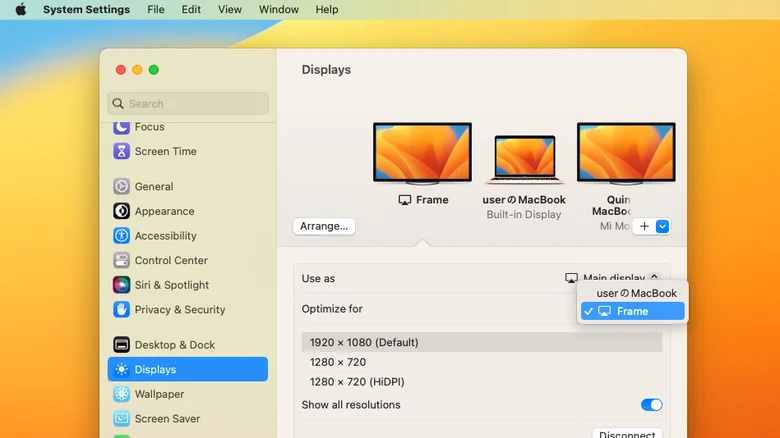
- Click Displays in the left sidebar.
- Next to Optimize, click your Mac and select your TV from the list.
Alternatively, adjust the display resolution on your Mac. Toggle on “Show all resolutions” and try different options to see what fits your TV best. If these adjustments don’t work, you might need to change the picture settings directly on your TV, typically found under the Settings or Display section.
Tips for Improving Your Mac’s Display on a TV
Getting your Mac screen to show on your TV is just the beginning; ensuring it looks and sounds great is crucial. Start by placing your TV in a location away from direct sunlight to reduce glare and enhance visibility of your Mac’s content. If relocating isn’t an option, adjust the TV’s brightness manually for a clearer picture. To fine-tune the display settings on your Mac, follow these steps:
- Click the Apple icon on your Mac.
- Select System Settings.
- In the left sidebar, choose Display.
- Pick your preferred resolution.
In the Display section, you can choose to use your screen as either a primary display or a mirror. For optimal audio experience, you can also adjust where your sound plays.
On your Mac, click the Apple icon.
Select System Settings.
In the left sidebar, click Sound.
Click Output > your TV name.
Alternatively, you can opt for an external speaker setup if you prefer. If you’re unsure which setup suits you best, consult our team’s ranking of major surround sound brands based on customer reviews.